I’ve used Spotify for years and have it configured to deliver the ultimate level of quality and best performance possible—and this is how you can do it, too.
Boost Audio Quality to Maximum
Spotify can automatically adjust audio quality based on your internet connection, meaning you might not always get the best sound experience possible. To enjoy Spotify at its highest fidelity, especially if you’re using quality headphones or speakers, change your settings to the maximum available quality.
It’s a simple tweak, too, on either your desktop or mobile device.
- On Windows/macOS: Head to Settings > Playback > Audio Quality, and set Streaming quality and Download to Very High.
- On iPhone/Android: Head to Settings > Media Quality. Now, set both Wi-Fi Streaming Quality and Cellular Streaming Quality to Very High.
One extra setting to note on both versions is Auto-Adjust Quality, which you can leave switched on if you’re expecting to encounter a spotty connection. It automatically makes allowances for changes in your connection quality to ensure your music always sounds as good as possible.
You can also switch your Download Quality to Very High so that when you play downloaded tracks, they’re also of the highest quality possible.

Related
How to Download Spotify Songs to Listen Offline
Spotify lets you easily download music and/or podcasts to listen to offline.
Normalize the Volume
Once you’ve cranked the audio quality, it’s time to make sure that each song plays at the same volume with the Normalize option. In short, Normalize makes sure that even if a song is mixed louder (or quieter) than others in the same playlist, it’ll play at the set volume.
It stops those moments where your ears take a pounding due to the difference between songs and ensures consistent listening.
There are three options available to you: Loud, Normal, and Quiet. I tend to keep mine set to Normal, as you can make volume adjustments on the device you’re listening on.
Use the Equalizer to Personalize Your Sound
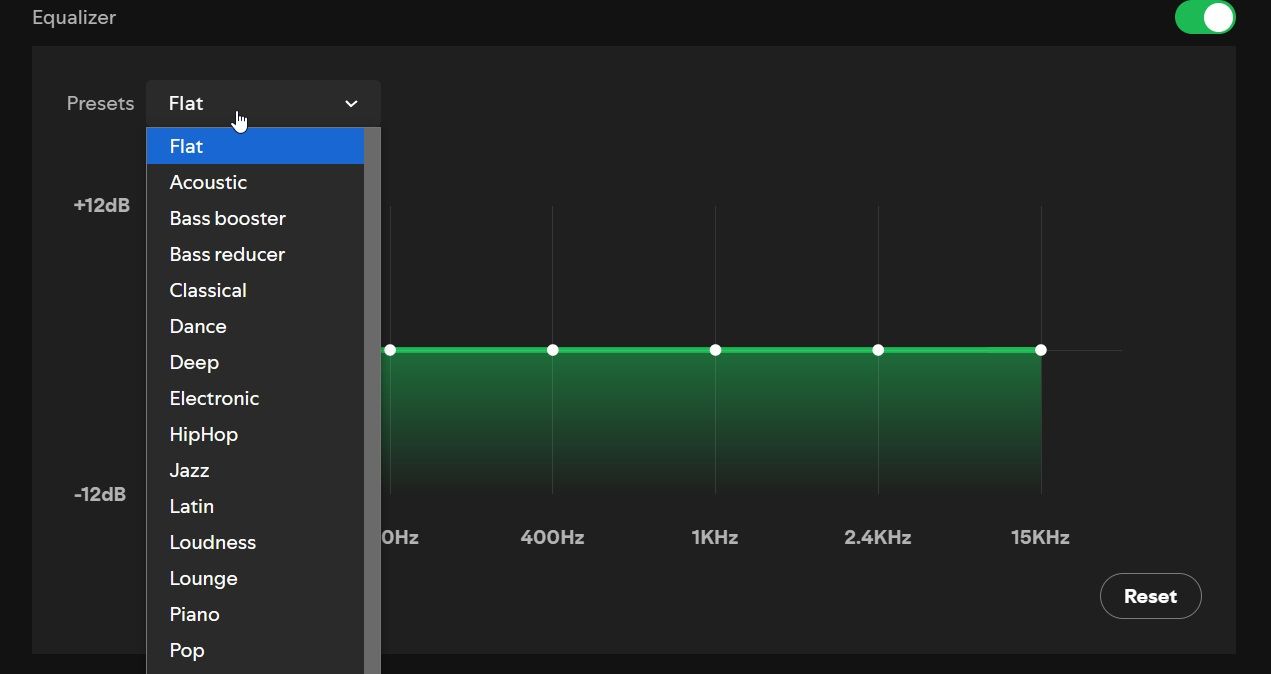
Spotify’s Equalizer isn’t the most detailed, but it’s handy enough if you want to make some specific tweaks. However, I’ll caveat this with the fact that there is no one-size-fits-all EQ setting for every type of music, which does mean you’ll have to tweak as you go if you regularly chop and change.
Now, the Spotify EQ does have some presets, such as Rock, Pop, Dance, Electronic, Classical, and so on. As the Spotify EQ is a graphic EQ with just six frequencies, the detail you adjust within these is limited.
However, you can adjust the highs, lows, and mids slightly, allowing you to tailor the music to your preferences.
- On Windows/macOS: Head to Settings > Equalizer.
- On Android/iOS: Head to Settings > Playback > Equalizer.
In both cases, you can make the adjustments manually or select a preset from the dropdown menu.
Adjust the Crossfade and Gapless Playback
Spotify’s crossfade function enables tracks to blend seamlessly into one another, creating a smooth and continuous listening experience similar to a professional DJ set. Gapless playback is particularly useful for live albums or concept albums designed to flow continuously.
You can adjust the crossfade length up to 12 seconds. You’ll want to play around with this option until you find the right setting.
On Android and iOS, you also have an option to adjust Gapless Playback, which also removes any gaps between tracks. Head to Settings > Playback and enable Gapless Playback.
Adjust the Data Settings
Spotify’s data settings also affect audio quality. Simply put, if you set your data consumption to Low, the audio quality drops accordingly to accommodate your settings. Switching Data Saver On reduces the amount of data used and effectively overrides any other audio settings you’ve selected, such as Very High settings.
If you’re using a wired connection, you won’t see this setting. Spotify assumes that a wired connection doesn’t require such fine-tuned adjustment for data use. The Data Saver option is available to those using Spotify on mobile devices.
- On Android/iOS: Head to Settings > Data Saving and Offline, then adjust the Data Saver options.
You can always toggle this option on if needed, but be aware of its impact on your audio quality.


